How to add another language. How to add a language to the language bar in Windows? My Computer Icon
The language bar is an icon in the taskbar that allows you to quickly change the keyboard layout or input language. When you switch the language using the keyboard keys, the language bar also reflects the changes that have occurred. Sometimes, as a result of careless actions or due to the malicious influence of installed programs, this panel disappears from the desktop and it becomes unclear which layout is currently being used. The simple instructions below will tell you how to return the disappeared language bar to its place. There are two ways, consider both in more detail.
To return through the Control Panel, do the following:

Registry
The second way to return the missing socket is to edit the registry of the operating system. It happens like this:

Task Scheduler
In addition to the actions of programs and the user, the disappearance of the language bar may be due to the fact that the Task Scheduler service has stopped working. Therefore, sometimes to restore the language bar, it is enough for this system service to work correctly. To run it, do this:

Only two languages are available: Russian and English. For most users, this is enough. But, if you need to enter text in another language (for example, in Ukrainian), then you need to add this language to the language bar. Luckily, this is pretty easy to do. Now we will walk you through how to add a language to the language bar step by step.
And go to the "Clock, language and region" section.

After that, the "Regional and Language Options" window will open in front of you. Here you need to go to the "Languages and Keyboards" tab and click on the "Change Keyboard" button.


After that, a small window will appear for adding languages to the language bar. Here you need to mark those languages that you want to add and click on the "OK" button.


Other settings for the language bar and input languages
In addition to adding a language to the language bar, other settings can be made in the Text Input Languages and Services window. For example, you can change the default input language. To do this, select the desired language in the drop-down list at the top of the window.

You can also change the order of languages in the language bar. To do this, select one of the languages and change the position using the up and down buttons.

If you go to the "Language Bar" tab, you will see settings that relate directly to the Language Bar itself. Here you can hide the language bar, pin it to the taskbar, or allow it to be located anywhere on the screen. Also here you can turn on the transparency of the language bar and enable the display of additional icons.

On the last tab, which is called “Keyboard Switching”, you can change the logic of the Caps Lock mode, as well as change the keyboard shortcut responsible for switching input languages.

As you can see, the language bar has many different settings, which allows you to customize the work with input languages in a way that is convenient for each specific user.
Very often, users of personal computers and laptops need to add a specific input language. By default, all versions of Winodws for the CIS countries have Russian and English input languages. But what if you need to add some other language, such as Ukrainian or Belarusian?
In this article, you will learn how to easily add a language to the language bar on windows 7, windows 8 and windows 10.
Adding a language to the language bar in windows 7
To add a new keyboard input language in Windows 7, you need to click on the language bar near the clock on the taskbar 1 time with the right mouse button and select "Settings" in the menu that opens.
Opening the language bar settings in windows 7
The Text Input Languages and Services window appears. Here, click the "Add" button.

Let's start adding a new input language
In the newly opened window, select the desired input language, open the "Keyboard" sub-item and tick the required language. After that, the "OK" button in the upper right corner of the window will become active. We press it.

Choosing a new language for the language bar
We make sure that the new language is added to the Windows 7 language bar.

Check if the language is added
Adding a language to the language bar in windows 8.1
In windows 8.1, adding a keyboard language is as follows.
We click 1 time with the left mouse button on the language bar near the clock. Select "Language Settings".

Go to language settings
In the window that opens, you will see all the input languages currently installed. To add a new one, click "Add Language".

Adding a new input language
In the window that opens, select the required input language and click the "Add" button.

Choosing a new input language
The process of adding an input language for the Windows 8.1 keyboard is now complete.

We make sure that the new input language is added to the language bar in windows 8.1
Add a language to the language bar in windows 10
In windows 10, the process of adding an input language is simplified to disgrace. Finally, the developers realized that they did not need to hide this setting as far as they did in Windows XP or Windows 7.
So, at the bottom right, left-click 1 time on the language bar (where it is shown which language is currently enabled) and select "Language Settings" in the menu that opens.

Open language settings windows 10

Adding an input language to windows 10
In the next window that opens, select the required keyboard input language by clicking the left mouse button.

Input language selection
That's all, the language has been added to the windows 10 language bar.

Added language in windows 10 settings
In Russian-speaking Windows 7, almost always initially there are only 2 languages for text input: Russian and English. Often there are situations when Ukrainian, French, German, Spanish, Portuguese or some other input language is required for work or study, and in your Windows it is not available in the language bar. No big deal, it's easy to fix in minutes. In this article, I will show you how to add a language to Windows 7 in two ways.
How to add a language in Windows 7. The first way
The easiest way to add a new input language is through the language bar options. To do this, right-click on your current language in the Windows taskbar (usually at the bottom right of the screen, slightly to the left of the time, RU or EN). Select from the list that appears "Options ..".
The "Text input languages and services" window will open, click the "Add" button to the right of the list of your current input languages.

Scroll through the list and click on the [+] next to the desired language, then click the [+] next to "Keyboard" under the selected language, check the box next to the desired keyboard layout. Click OK.


Now when you change the keyboard layout (Alt + Shift or Ctrl + Shift), you will be able to enter text in the language that you just added to the Windows 7 language bar.
How to add a language in Windows 7. The second method
The second way to add an input language is similar to the first, the only difference is that we will add the language not through the language bar settings, but through the Windows control panel. Click Start Menu —> Control Panel —> Clock, Language and Region —>, or Start Menu —> Control Panel —> Regional and Language Options. In the window that opens, select the tab "Languages and keyboards", click the button "Change keyboard ..".

The Text Input Languages and Services window opens. Next, add the language in the same way as it is written in the first method. I will not repeat. You can add as many input languages as you like, but I do not recommend too many, otherwise it becomes inconvenient to switch between them.
When installing the Winodws operating system, be it XP, Vista, 7, 8, etc., you will see two languages in the language bar that is in the tray. This includes the main language (for us it is Russian) and additionally English. But not all users know that additional languages can be added to the panel. That is what I will talk about today. An example will be shown based on Windows 7.
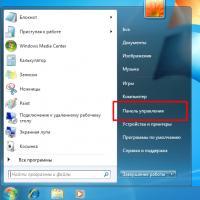
The first step is to open the control panel. To do this, click on the "Start" button, and then select the "Control Panel" item.

When the Computer Settings window opens, select Regional and Language Options.

A window of the same name will open in front of you. Here's what it looks like.

Select the "Languages and Keyboards" tab, then click on the "Change Keyboards" button.

A small window will open. Staying on the "General" tab, click on the "Add" button.

In the add language window, you need to select the language itself. For example, I select the Italian language, check the box next to it and click on the OK button.

Language added. If you suddenly want to remove it, click on the language itself, then click on the "Delete" button. If everything is in order, click on the "Apply" button to save all changes.

To check that the language is definitely added, click on the language bar and see the added language.

In a similar way, you can add a lot of different languages to your taste.